Satellite tracking program for tracking multiple satellites
This program allows automated tracking of
multiple satellites. From the list of satellites observed by NORAD, you
can select a maximum of 20 favorites, which the program then arranges
in order of their setting. The satellites are then tracked based on
this order. When the currently tracked satellite sets, the program
switches to tracking the next satellite.

Description:
After starting the program, you will see the above figure. The
coordinates of the observer can be found on the upper left. If you
click on the "Latitude", "Longitude" or "Altitude" field, a text input
window opens, where you can enter your own coordinates and height above
sea level. By clicking on the map, we can
choose the one we like best from among four different maps.
The color of the Satellite field is white if the satellite is below the
horizon, yellow if it is above the horizon. If the "flip" function is
enabled (MAX. ELE: 180) and the satellite's orbit requires the use of
this function, the color of this field will change to cyan. In this
case, the first number shows the direction of the satellite, while the
second shows the direction of the antenna.
INFO - By clicking this button, the following screen will appear:

Here we can see the coordinates of the observer, as well as the data
relating to the current satellite (NORAD idinfo_sat_list[i]['akt'] == 'a':info_sat_list[i]['akt'] == 'a':entification number, name,
when was the satellite database last updated, how old is the orbital
data of this specific satellite, perigee, apogee, the inclination angle
of the orbit, and time of one orbit. If you click on the NEXT PASS
button, you will see the following page:
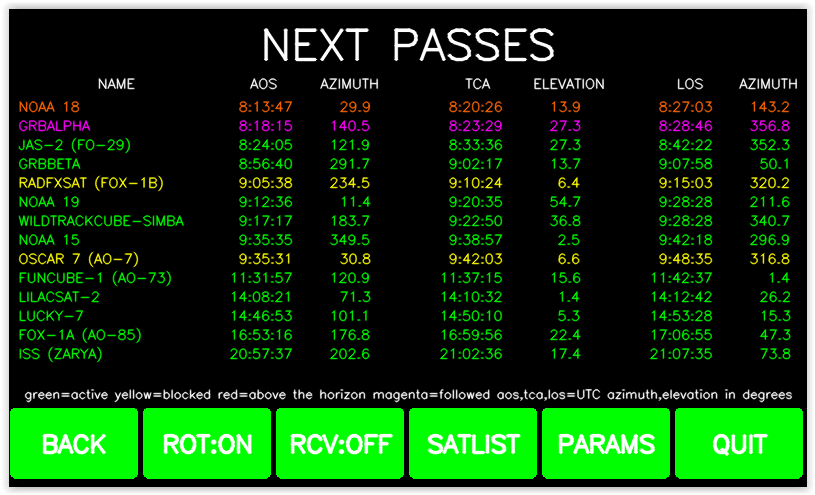
Here you will see a list of your favorite satellites in the order of
the time of their closest setting. The meaning of the colors is as
follows:
green - satellite is active, will be tracked
yellow - satellite blocked, will not be tracked
red - the satellite is currently above the horizon
magenta - the currently tracked satellite
lightblue - the satellite is currently above the horizon but it is not active
By clicking on the corresponding row, the satellite shown there can be
activated or deactivated. In this case, the color of the row changes
accordingly.
From here, by clicking on NEXT PASSES, we return to the main window, by
pressing the individual buttons, we reach the corresponding menu.
ROT: ON or ROT:OFF - with this we can turn the rotation off or on. If
the path to the rotator has not been set in the PARAMS menu, or the
path to the rotator has been set incorrectly, we cannot switch the
rotator to the ON position.
RCV:ON or RCV:OFF - here you can switch the receiver's automatic tuning
and doppler correction on and off. This must also be set beforehand in
the PARAM menu.
Click on SATLIST to select your favorite satellites:
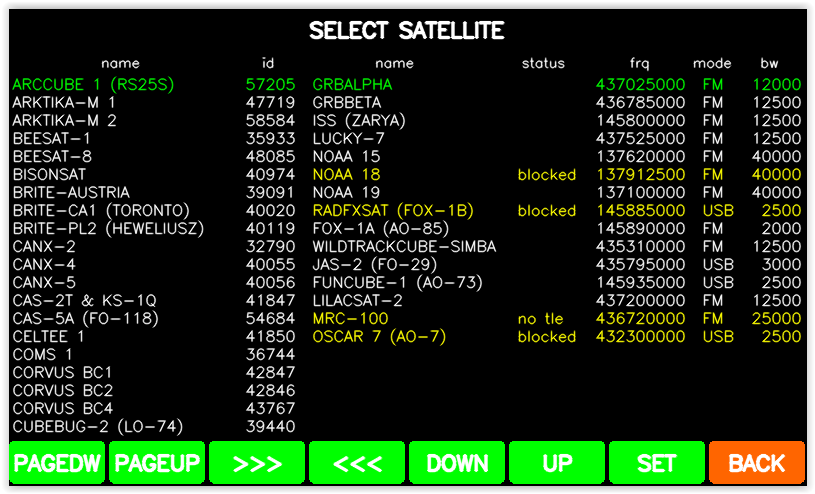
The list of all satellites and their NORAD identifiers can be seen on the left
side of the window. The length of the list depends on the track data
requested in the PARAMS menu (see later). The right side contains the list of favorite sattelites. The 5 columns contain the
parameters associated with the sattelite: the first is the name of the satellite, the
second shows whether the satellite is active or not, the third column
contains the frequency assigned to the satellite, the fourth the
operating mode, and the fifth the bandwidth. The latter three data must be
provided by us. We can do this in two ways. The first option is to
click on the appropriate data and then enter the appropriate value in
the input window that opens. Another option is to select the desired
satellite by clicking on the name of the satellite (it turns green),
then enter the desired values in the input windows that appear by
pressing the SET button.
Edit FAVORITES:
Select the desired satellite in the left column of the window. With the
PAGEDW and PAGEUP buttons, we can scroll page by page, then when the
name of the desired satellite appears, we click on it. In this case,
its color turns green. By clicking the >>> button, the
satellite will be transferred to the favorites (if there is still room
for it). You can delete a satellite from the list of favorites by
clicking on the name of the satellite you want to delete in the third
column (it should also turn green), then press the <<< button.
With the DOWN and UP buttons, we can move between the favorites.
So far, all changes have been temporary. To save the set data click the BACK button to go back to the previous window.
Click on the PARAMS button to access the settings window:
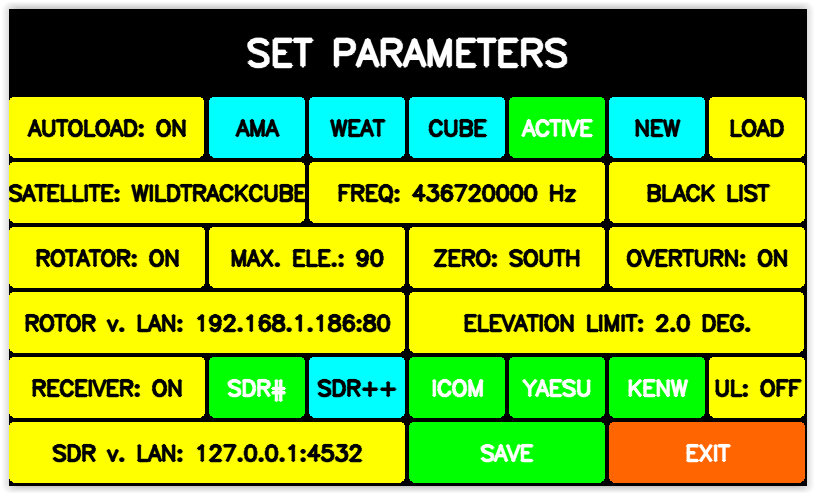
Here we can set the following:
AUTOLOAD ON or OFF - with this we can determine whether the program
updates the course data automatically every 12 hours, or the
update is done manually.
AMA - list of radio amateur satellites
WEAT - list of weather satellites
CUBE - list of cubesat category satellites
ACTIVE - list of active satellites (extensive list - search only if the desired satellite is not included in another list)
NEW - list of satellites launched in the last 30 days
The color of the button of the selected list is cyan if it is active and green if it is not.
LOAD - when you press the button, the trajectory data of the selected
(cyan colored) satellites will be retrieved (don't play with this
button too often, because you may be banned from the database)
SATELLITE - here you can enter the name (or identifier) of a specific satellite. This satellite will then have priority.
FREQ - frequency associated with the selected satellite.
ELEVATION LIMIT - the program will only track the satellite if its maximum elevation reaches the value set here.
ROTATOR ON or OFF - disables or enables the operation of the rotator.
MAX ELE - depending on whether the antenna design allows a 180-degree turn, its value is 90 or 180.
ZERO SOUTH or NORTH - depending on where the base position of the antenna is
OVERTURN ON or OFF - does the antenna design allow it to overturn the base position or end position.
RECEIVER ON or OFF - depending on whether we want to use doppler correction
SDR#, SDR++, ICOM, YAESU, KENW - receiver type
UL ON or OFF - for ICOM, YAESU and KENWOOD radios, you can turn on the
doppler correction of the uplink (if you also want to transmit, not just
receive). In this case, VFO-A is the downlink and VFO-B is the uplink
Doppler-corrected frequency.
BLACK LIST - when we retrieve the orbit data of the satellites, there
are some among them that we are not interested in (the data of the more
than 7000 StarLink satellites is rarely needed). In this blacklist, we
can enter the collective name of the satellites that we do not want to
see on our own list in SATLIST.
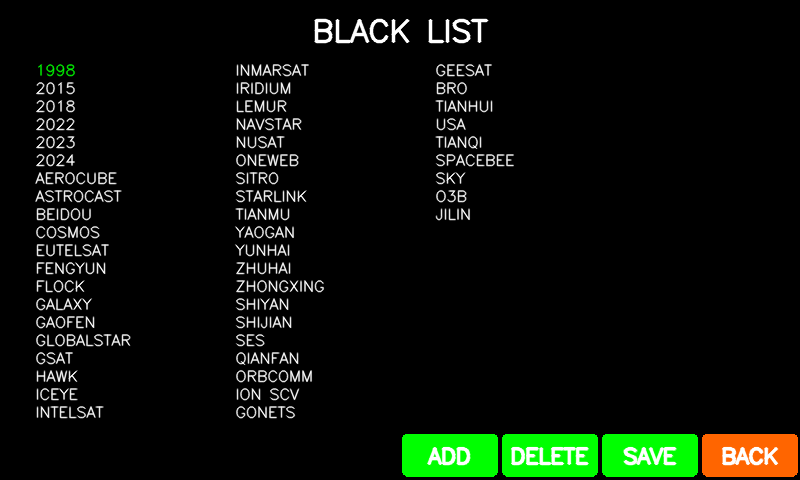
The list can be expanded with the ADD button, while the selected
satellites (green color) can be deleted from the list with the DELETE
button, so they become available again. If you want to save the
changes, press SAVE, if you don't want the changes, press the BACK
button to exit without saving.
ROTOR and SDR - by clicking on these buttons, we gain access to the rotator or the radio settings. This window will open:
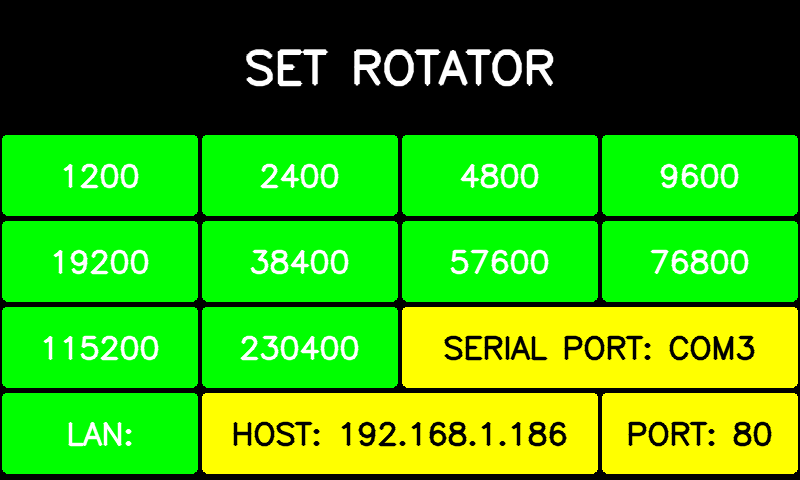
If you want to communicate with the rotator or the radio via a serial
port, clicking the SERIAL PORT button will bring up a window with the
available serial ports:
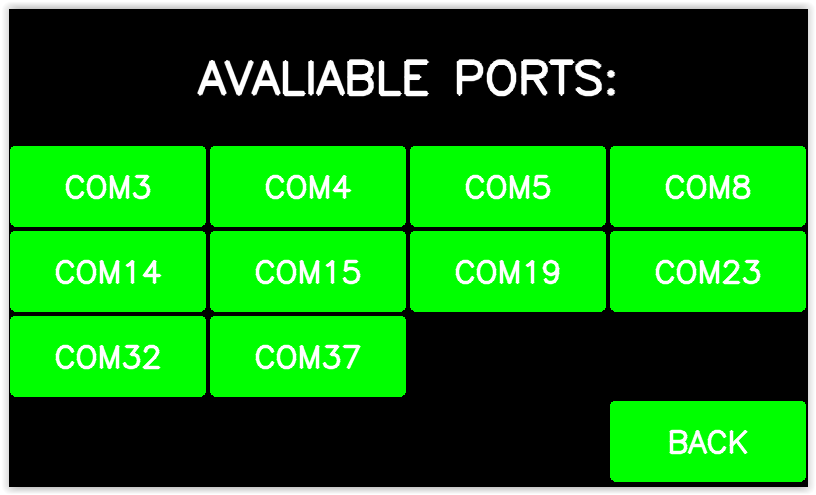
Choose the appropriate one from among them (it will automatically
return to the previous screen). If we now click on the desired
transmission speed from among the green buttons, we will communicate
with the rotator or the radio at the selected speed at the previously
selected port. If we prefer communication via LAN, we can enter the IP
number by clicking the HOST button and the communication port number by
clicking the PORT button. If we want to use this setting, we exit by
clicking the LAN button. The green buttons are for returning, the
yellow buttons for setting.
The program is available for Windows 10 here: sattrack.zip
The program does not require installation. Unpack the extracted zip
file into a directory of your choice (I recommend using SATTACK). After
unpacking, click on the .exe file to start the program and enter the
PARAM menu to make the necessary settings.
The program was written in python3 programming language, so it also
runs on Linux-based machines after installing the appropriate libraries
and add-ons. The development itself took place on a Raspberry Pi5 -
Bookworm machine.
This program is mainly made for the project called "Interface for AlfaSpid BIG-RAS rotator with graphic display" on my website, because it can communicate via WiFi, but it can also be used for other Yaesu GS232 compatible rotator.
The
program is the intellectual property of the author. Its commercial use
is only permitted with the written consent of the author!