Graphical interface for the smogcli2 receiver
This program is not made for professionals, but for hobbyists. It helps in parameterizing the receiver and the decoding program.
Instalation:
The first time never hurts:
sudo apt-get upgrade
sudo apt-get update
If nothing is installed yet, only the
operating system, the easiest way is to download the entire installer
and then start it:
wget www.om3bc.com/docs/smogcli2/install_all.sh
bash install_all.sh
This script installs all necessary programs (you may have to press y during this).
If smogcli2 is already installed, only the graphical interface is enough.
If this is not your first attempt, don't forget to delete the previous installer:
cd ~
rm install_mrc.sh
For 32-bit or 64-bit Bullseye:
wget www.om3bc.com/docs/smogcli2/install_mrc.sh
bash install_mrc.sh
Now you can enjoy, because if everything works well, the installation
will automatically upload everything, but it will take some time.
When the installer is finished, check whether mrc100_rtl_rx,
mrc100_decode, or mrc100_pluto_rx are there in the MRC100 directory (if
you have uploaded the required libraries and the program has been
compiled). This is automatically copied by the installer from the
smogcli2/build directory. If you can't find it, copy it manually. Don't
forget to correct the contents of qthfile.txt. In theory, an icon
appeared on the desktop. By clicking here, or manually from the command
line:
cd ~/MRC100
python3 mrc100_rx.pyc
the program can be started with the command
I
developed the software on RPi4 with 32 and 64-bit Bullseye OS, but it
was also tested on RPi3. It is important that the
system is updated and that python3 version 3.9 is installed
(unfortunately, not all modules are currently available for 3.11).
Description of the program:
After the start, hopefully you will receive this image and not some error message:
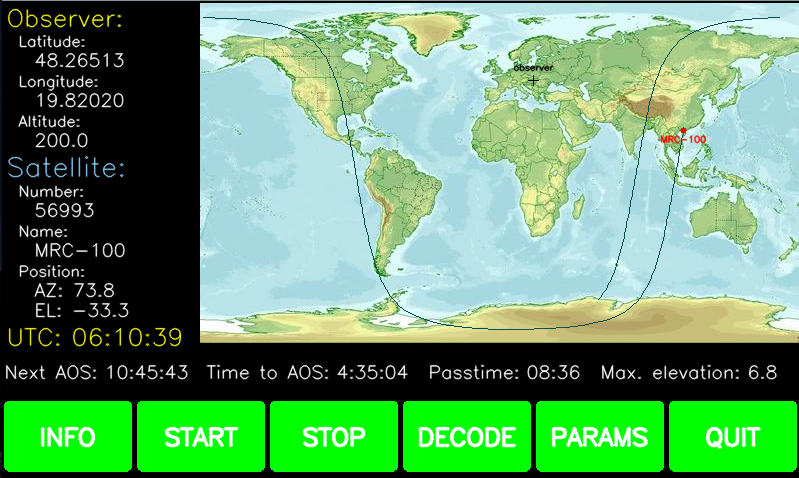
As a first step, set your own coordinates. Clicking on the
Latitude, Longitude and Altitude fields brings up an input window where
you can enter your own coordinates. You can do this in degrees.tenths
format, where + is east and north is - the west and south coordinates.
However, you can also enter it in the format DD:MM:SS.SX, where X is
W,E,S or N. You can select the satellite in the Satellite field. Here
you can refer to the satellite by its name or its identification
number. If you want to refer to it by its name, it is not necessary to
enter its full name, it is enough to enter enough characters, based on
which the satellite can be clearly identified. In the case of the
MRC-100, MRC is enough (until someone sends up a satellite whose name
begins with MRC). By default, the Satellite field is red. This is a
warning that the receiver is not running. You can start the receiver
with the START button and stop it with the STOP button. If you want to
receive the MRC-100 (56993), then there is no problem, because the
program automatically starts the receiver 3 minutes before the arrival
of the satellite. In this case, the field turns white, then when the
recording starts, the field changes to green. By clicking on the map, you can choose from 4 types of maps.
By clicking the INFO button, you receive this image:
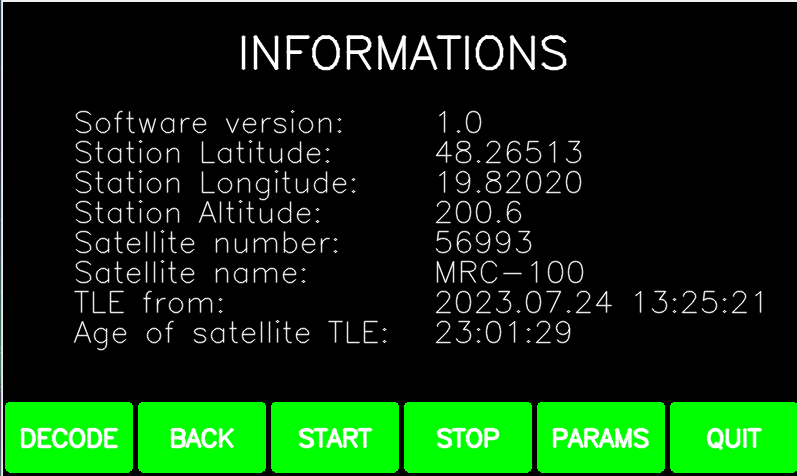
You can return to the previous window with the BACK button, or you can go further by pressing another button.
You can set the parameters of the receiver program by clicking the PARAMS button. In this case, this image appears:

You can disable the automatic update by clicking the AUTO LOAD
TLE button. In this case, the button turns red and the word OFF is
displayed. CUBESAT, ACTIVE, NEW (tle-new) defines the database to be
downloaded. If SAT ID is selected, only the track data of the current
satellite is retrieved, which is about 1kB and not hundreds or 1
megabytes. Among the CUBESAT, ACTIVE, NEW and SAT ID buttons, one
button is cyan, while the others are green. By clicking the LOAD
button, you can immediately update the track data. It always retrieves
the cyan-colored database, regardless of whether AUTO LOAD is yellow or
red. If the automatic track data update is active (the background
of the button is yellow), the program checks how old the tle.txt file
is 3 minutes before the arrival of the satellite. If it is older than 4
hours, it will retrieve the new track data. If tle.txt is newer than 4
hours, it checks how old the data of the satellite you want to track
is. If they are older than 18 hours, regardless of the age of tle.txt,
it retrieves the new data, assuming that they have been updated in the
meantime. By clicking the LOAD button, you can immediately update the
track data. If you use PLUTO, this package also includes the
mrc100_pluto_rx.cpp file. If pluto was already installed, it was
updated with this file. With this updated version, you can set the
frequency correction not only for the rtl-sdr radio, but also for the
pluto, with the ease that you don't have to bother with calibration. At
first, click the CALIBRATION SDR button to set 0. After receiving the
satellite, you decode it, then look into the *.pkts file with a text
editor. you can see the deviation at freq. You make an average from the
values you see there, and enter that value as a correction (if the
frequency is negative, you enter a positive number in CALIBRATE and
negative if freq is positive). If you use rtl-sdr, you enter CALIBRATE
in ppm as standard. At SATELLIT ID, you can also enter the name or
identifier of the satellite. It primarily expects a number here, but
you can also switch to letters. By default, the background of SAVE is
green. If you change one of the parameters, it turns red, warning you
to save the new values. If you exit with EXIT, the old data will remain
in effect.
You can observe the received signal in real time on a waterfall
diagram:If the purchase was successful and you have a cf32 and meta
file, then go to the decoder:
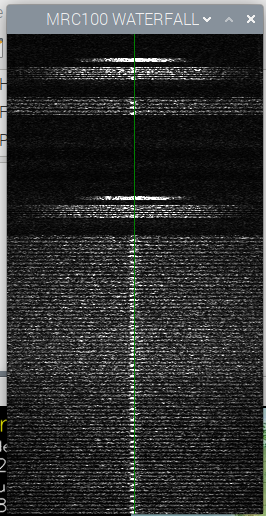
The minimum signal level is set by WATERFALL MIN. LEVEL, while the
maximum signal level is set to WATERFALL MAX. button. The value
of these two variables largely depends on the local conditions, such as
environmental noise, the receiver's own noise, the type of receiver,
etc.
If the purchase was successful and you have a cf32 and meta file, then go to the decoder:
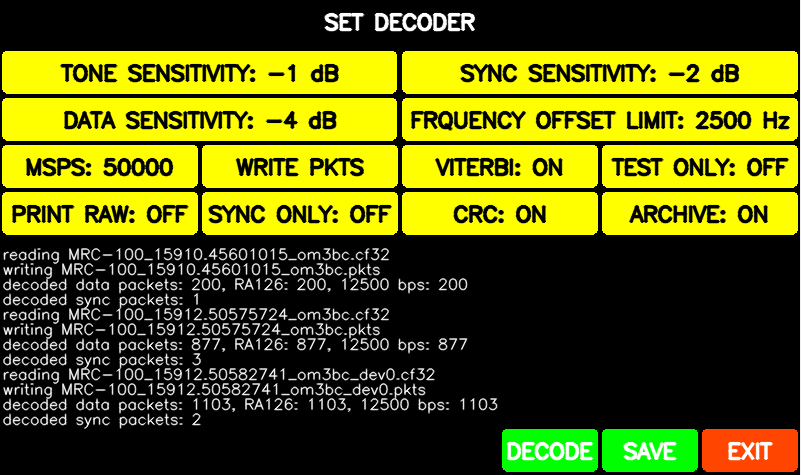
You can also set the desired values here, then click the DECODE button
to start the decoder with the current parameters. SAVE here is also
green or red, depending on whether you have changed the values. You can
start the decoding several times with different parameters to see which
values are better. If ARCHIVE is ON, the program moves the cf32 and
meta file to OLD_cf32 while the generated pkts file is moved to the
OLD_pkts directory upon exit.
Everyone has to ensure that the generated pkts files are sent to the server.
Have fun!
The packaged program can be found here: www.om3bc.com/docs/smogcli2/mrc100.tar.gz
it can be unpacked with the tar -zxf mrc100,tar.gz command