Search for meteorological sonde with RaspberryPi
Often, the sonde, that you want to search on the
field, can not be taken coordinates low enough, so it is necessary to
get more accurate coordinates near the landing point, or the situation
requires the so called "foxhunt" method start to be need searching the
probe. In these cases, this small program can be usefull. To run, we
need a Raspberry Pi with a TFT display and touch screen combinations.
Since the program is handled via the touch screen, there is no need to
connect another things to use it, only an rtl-sdr radio connected to
the RPi's USB port. If you want to use the "Fox Hunter" method, you
will naturally need a direction-sensitive antenna. If we're just
looking for the final coordinates, there is enough en omnidirectional
"wire", similar as used at the sonde itself. However, I strongly
recommend using the HB9CV type antenna. This antenna has a small size
to use it confortable way on the field and it is perfectly enough for
both searching and coordinate decoding.
Installation:
As a first step, you need to install the
raspbian operating system with the graphics interface and the
appropriate drivers for the used touchscreen display. If everything
works properly, you can install the program itself.
If you have a newly installed operating system, open the console window and enter it:
sudo wget www.om3bc.com/docs/SF/install_all.sh
this command save the installer to the current directory.
Enter it end put ther this command:
sudo chmod a+x install_all.sh
./install_all.sh
if everything goes well, then the full of packages comes with all the accessories.
If there is a problem, you can try install by hand. It may be the solves of the problems. This are the commands:
sudo apt-get install cmake build-essential python-pip libusb-1.0-0-dev python-numpy git pandoc -y
sudo apt-get remove rtl-sdr -y
sudo apt-get install git-core libusb-1.0-0-dev pkg-config cmake -y
git clone https://github.com/keenerd/rtl-sdr
cd rtl-sdr/
mkdir build
cd build
cmake ../ -DINSTALL_UDEV_RULES=ON -DDETACH_KERNEL_DRIVER=ON
make
sudo make install
sudo ldconfig
sudo apt-get install sox
sudo pip install pyrtlsdr
mkdir /home/pi/SondeFinder
cd /home/pi/SondeFinder
sudo wget www.om3bc.com/docs/SF/sondefinder.tar.gz
tar -zxf sondefinder.tar.gz
sudo rm sondefinder.tar.gz
cd Desktop
cp sondefinder.desktop /home/pi/Desktop
cd ..
Once the libraries have been installed and you want to update the program itself, you can write it at the command prompt:
./install_prg.sh
or manually:
cd /home/pi/SondeFinder
sudo wget www.om3bc.com/docs/SF/sondefinder.tar.gz
tar -zxf sondefinder.tar.gz
sudo rm sondefinder.tar.gz
Setting-up and use it:
If the program is properly installed, a SondeFinder
icon must apper on the the Desktop. Click on it at the touch screen, it
is how to program will start.
If you have a problem, try run the program from command line.
cd /home/pi/SondeFinder/
python sondefinder.py
Without the receiver, the program not run!
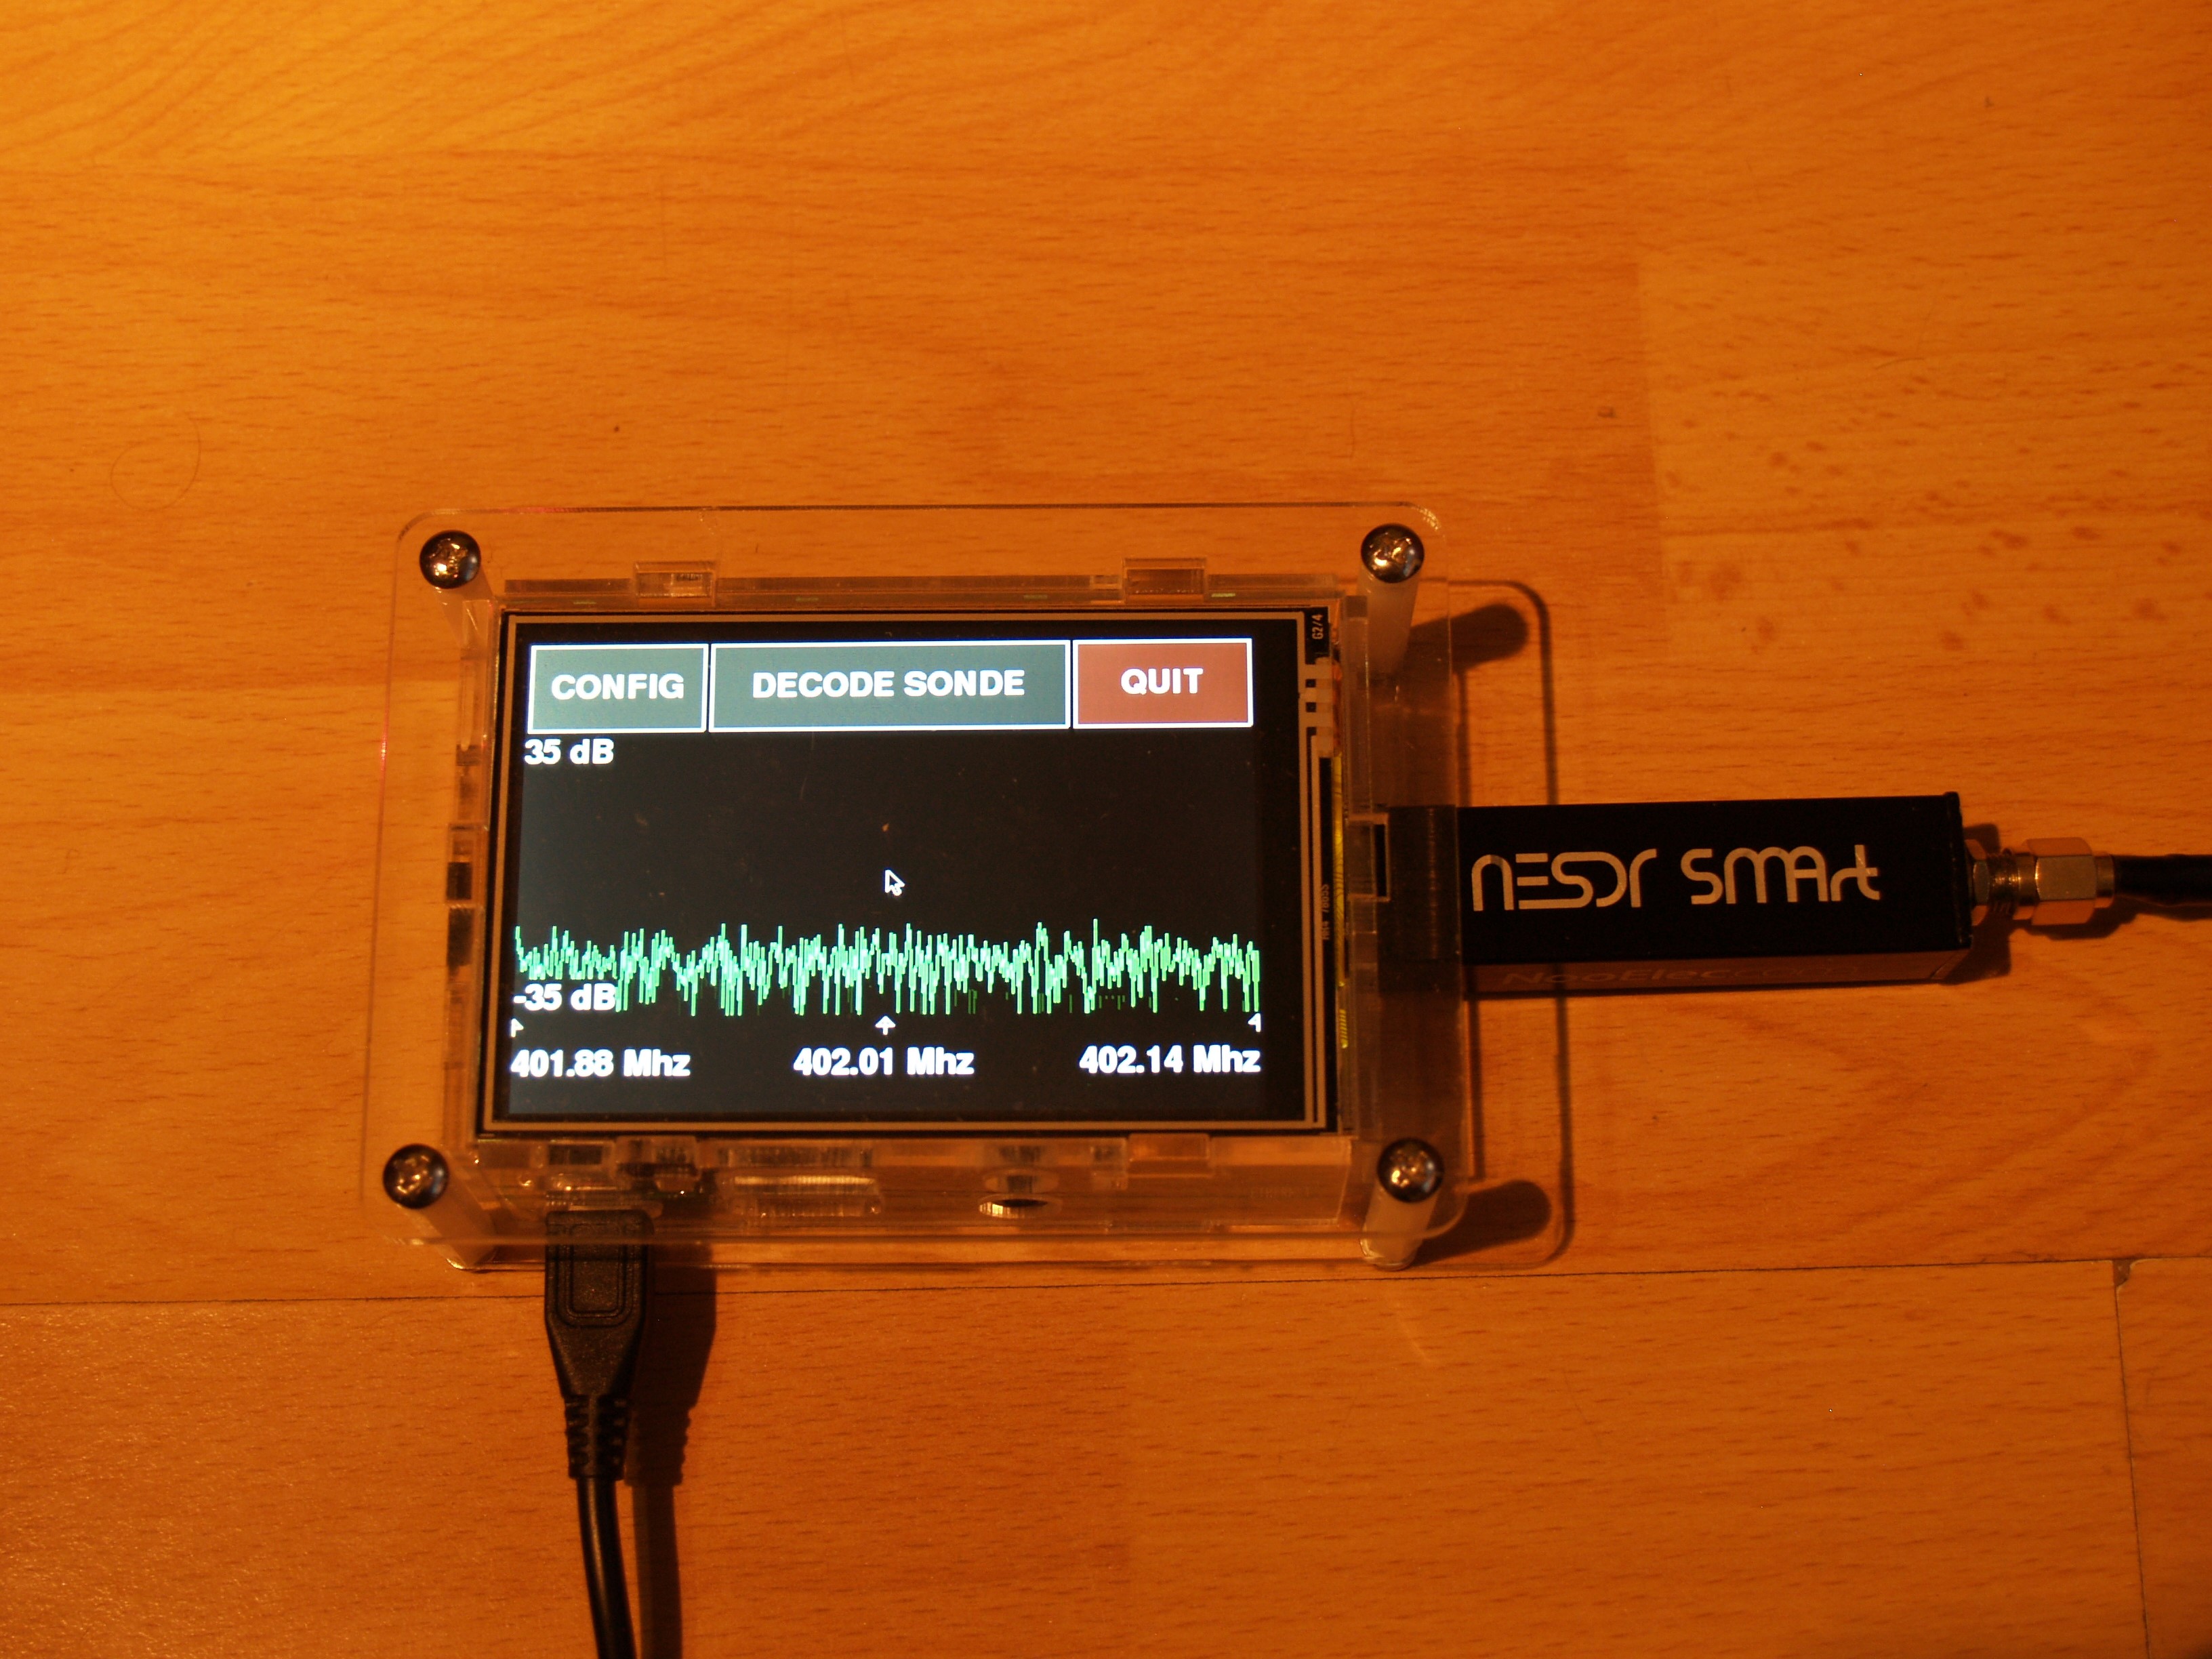
After the start, the spectrum analyzer must be displayed:
This mode can be used for searching or to determine the direction of
the probe. This will make decoding more reliable and faster.
If you need to change the settings, press the CONFIG menu item:
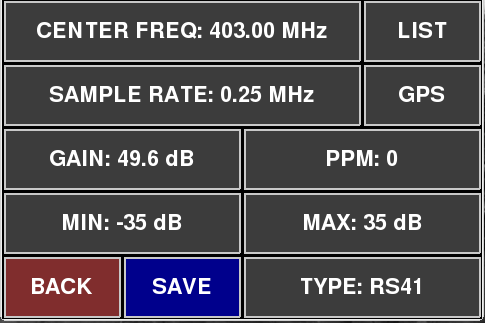
Here you can enter the receive frequency, the sampling rate, the
gain, the error correction, the upper and lower limits of the spectrum
analyzer, and you can select the type of sonde.
If
you exit with the BACK button, the set values will not be stored. When
SAVE is selected, the set parameters will be stored
and will be valid at the next turn-on or restart. The parameters are
stored in the "device.cfg" file. The last line of this file contains
the 'debug' parameter. If the value of this is changed to ON, the
received data will be continuously written out in the terminal window,
both for the probe and for the GPS.
The frequency can be entered as follows:
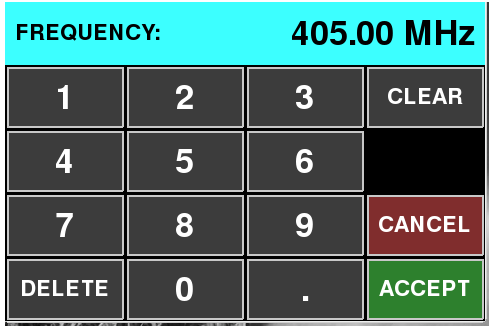
or select from the list. The list is in the "frequency.lst" file, which
can be modified with a text editor. The first data is the identifier of
the launch site, the second the frequency is in MHz and third is the type of sonde. Rows starting with
"#" are ignored.
Press CLEAR to reset the parameter, DELETE to delete the last
charakter. For CANCEL, the old value will remain, and for ACCEPT the
current value will be valid. Similary, other parameters can also be
changed.
If everything is oke, then the probe signal must be seen on the spektrum analyzer display.
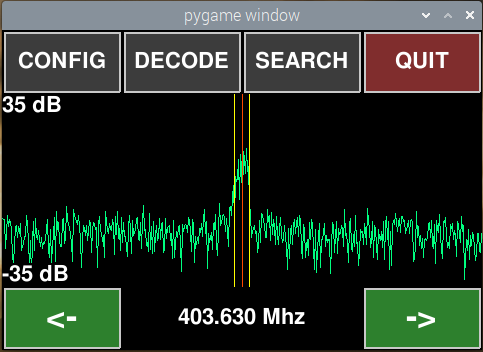
The program can decode radiosondes: RS41, DFM09, DFM17, PS15, PilotSonde, M10, M20, MP3H1 and iMet. Because the
program will mostly be used at a place where the internet is not
available, the program does not contain a decoder for RS92 (there would
not be enough fresh almanacs or ephemeris available). Because the
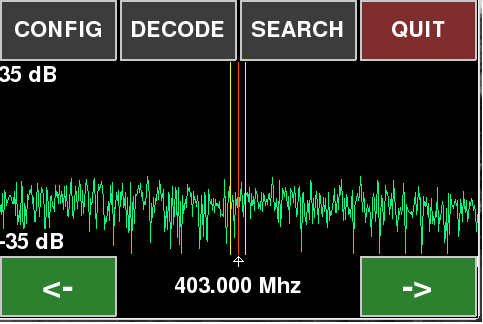
program does not contain AFC, it can happen that the actual frequency
for DFM, PilotSonde and M10 must be set manually. Use the < and > buttons. The signal must be symmetrically
positioned against a vertical yellow lines. Although the frequency is
only visible to 3 decimal places, it can also be entered with an
accuracy of 1 Hz (6 decimal places) in the CONFIG. When you tap on the center of the
screen, all the information is disappers, and only the spectral
analyzer cover remains. It is convenient to search by signal strength.
If this signal is strong enough, you can try decoding the coordinates:

The data is updated after every flawlessly received data package. In
order to return to the spectrum analyzer from this mode after pressing
BACK, sometimes you have to wait a few seconds. The current position
can be saved with the SAVE key. If you see WAIT with the red
background, it means
there is no valid data yet. For DFM probes, the probe-identifier should
sometimes wait 10 to 15 seconds. The name of the generated file is the
identifier of the probe. When the position is stored, the background of
the SAVE button changes to olive.
If you connect a GPS receiver with a USB port to a Raspberry (or a
conventional GPS receiver with a serial port with a USB-COM converter),
we can make it easier. The probe position should first be decoded. It
is advisable to save the position with the SAVE button. Then we leave
the decoder menu and enter the SEARCH menu. In this case, we'll see
this screen:
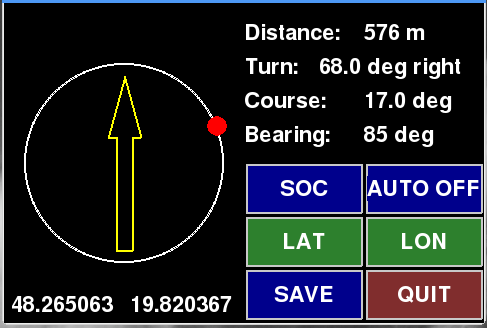
If the signal from the probe is strong enough or if we have
previously decoded the position of the probe and the GPS receiver sees
enough satellites to determine our position, then the search can begin.
In this mode, both the probe and the GPS reception work continuously,
so even the direction of the probe that is still in the air can be
continuously established. The yellow arrow shows the direction of our
movement and the red dot
indicates the direction we should go to the probe. Always hold the red
dot on the tip of the yellow arrow. The LAT and LON buttons can be used
to manually enter the position we are looking for. This may be good if
we are looking for a probe that no longer transmits, but we know its
exact position. If the main screen does not appear after pressing the
SEARCH button but an error message appears, the error must be
corrected. These may be as follows: the GPS receiver is not connected
to Raspberry, the serial port speed of the GPS receiver is not well set
or the probe has not been decoded before. Since there is no built-in
compass, we can only keep the right direction if we are moving. When we
stand, the position of the red dot does not change. Unfortunately, this
is the price of simple hardware.
In the bottom left we see our own current position. We can save our own
position with the SOC button (SAVE OWN COORDINATES). Our position is
then located in the file named mycoordinates.txt. You can turn on
regular backup with the AUTO button. In this case, our own location
is saved every 30 seconds, which we can then analyze and plot the path
we have taken.
The SOC button deletes the old mycoordinates.txt file, and opens a new
one. AUTO does not delete the old mycoordinates.txt file. If we want to
keep the old route, let's not use SOC, just AUTO.
Availability:
image of SD card: sf.zip
image for RPi2, RPi3 and RPi4 too.
default display is the standard HDMI. To swith to the 3.5" display, type at the command prompt:
cd ~/LCD-show/
sudo ./LCD35-show
to switch back to the standard HDMI:
cd ~/LCD-show/
sudo ./LCD-hdmi
if you need calibrate the touch sensor type at the command prompt:
ts_calibrate
full installer old version
full installer for Bullseye32
full installer for Bullseye64
update old version
update for Bullseye32
update for Bullseye64
program for old OS
program for Bullseye32
program for Bullseye64
old version without gps receiver
the program that inspired me
Software tested with home made USB-GPS (USB-TTL convertor + L86 receiver) and with the GPS-GLONASS dongle: