Multi-channel receiver for tracking meteorological sondes
Required operating system:
Raspbian Strech Lite:
https://downloads.raspberrypi.org/raspbian_lite_latest
Write the SD card as described there.
Installation:
You can install the program automatically with file install.sh:
wget www.om3bc.com/docs/MS/install.sh
chmod a+x install.sh
If the entire program package is already installed and you only want to reinstall the MS program itself: ms-install.sh
wget www.om3bc.com/docs/MS/ms-install.sh
chmod a+x ms-install.sh
./ms-install.sh
or manually.
Required libraries:
sudo apt install git-core build-essential libx11-dev libxext-dev libpng-dev libjpeg-dev screen libusb-1.0 -y
rtl-sdr:
If it's already installed, this part can be skiped.
You can install the program package automatically with file rtlsdr-install.sh:
wget www.om3bc.com/docs/MS/rtlsdr-install.sh
chmod a+x rtlsdr-install.sh
./rtlsdr-install.sh
sudo apt-get remove rtl-sdr -y
sudo apt-get install git-core libusb-1.0-0-dev pkg-config cmake -y
git clone https://github.com/osmocom/rtl-sdr
cd rtl-sdr/
mkdir build
cd build
cmake ../ -DINSTALL_UDEV_RULES=ON -DDETACH_KERNEL_DRIVER=ON
make
sudo make install
sudo ldconfig
Install the program:
mkdir MS
cd MS
the sonde_rx.tar.gz file must be copied to the MS directory and the file must be unpacked.
This is probably the simplest way to turn on SSH after launching and set in sudo raspi-config.
The WinSCP program is installed on the Windows machine. This allows remote access between the two machines.
This will also be usefull if Raspberry is not connected to any display or keyboard.
tar -zxf sonde_rx.tar.gz
rm sonde_rx.tar.gz
Open the configuration file:
nano station.cfg.example
set the parameters
This will be the new station.cfg - delete the .example at the end
Although this should be done by conf.conf.example, if necessary conf_second.conf.example and conf_third.conf.example.
launching:
(we are still in the MS directory)
according to the number of receivers
./start.sh
If the program does not start or freezes during a run, then in the error.log file can see what's wrong.
For any automatic startup (if you're interested):
sudo nano /etc/rc.local
Insert this, before the exit0 line:
#MS
sudo -u pi /home/pi/MS/start.sh &
When we want to make a program written in python ran in
screens, then start_sc.sh. This is advantageous if Raspberry does not have a
monitor and runs remote monitoring. If remotely enter Raspberry (say PuTTY), then we type in the command line:
screen -r sonde_rx
save it: CTRL X / Y / Enter
If necessary (if files were manipulated using Windows), you should run them:
(If they are not in green in the list after the ls command.)
cd MS/
sudo chmod a+x *.sh
cd bin/
sudo chmod a+x *
To keep the display "live" dont become dark after a while:
sudo nano /boot/cmdline.txt
there is one long line in it. To add this, after the long line:
consoleblank=0
save it
Comment:
Depending on whether you connected 1,2,3 or 4 rtl-sdr to Raspberry
you must set the ppm, the receiver's
gain, and desired frequencies in conf.conf, conf_second.conf,
conf_third.conf or conf_fourth.conf. If you
want a fixed gain, you will need to look at the index in the table and
enter it as parameter p 13 (or direct with parameter 4). The simplest way to get the best
signal-to-noise ratio is to experiment with the sdrsharp program, and
then
set the value in the config. Care should be taken to ensure that the
theoretical bandwidth of the receiver with RPi4 is 2.56 MHz (for other 3.2 MHz), out of which
approximately 2.45 MHz can be used (3.0 MHz for other). The sampling rate
can be set at the beginning of the init.sh file with parameters
SAMPRATE1, SAMPRATE2, SAMPRATE3 and SAMPRATE4. However, only those who know what
they are doing should access the init.sh file !!! Unfortunately, the
newer one is not always better. While older RPis managed without
difficulty with a sampling frequency of 3.2MHz (even RPi2), the highest
sampling frequency for RPi4 cannot be higher than 2.56 MHz! If you
still want to use RPi4, it is definitely recommended to rewrite the
SAMPRATE values in init.sh to 2560000. Thus, the distance between the
lowest and highest frequency in each .conf file must not exceed
SAMPRATE - 50 kHz. With two radios, full band reception is most often
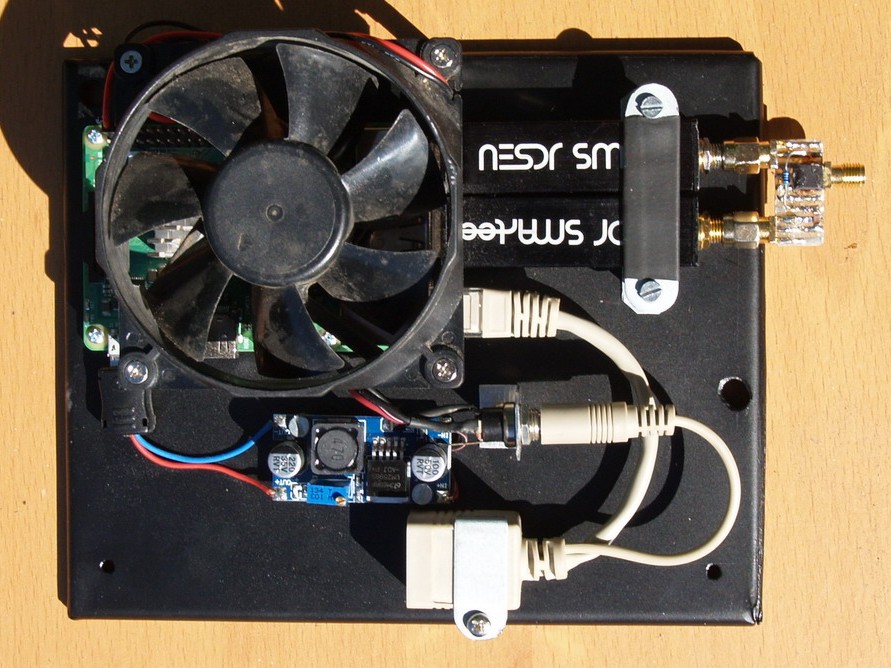
possible. RPi3 is necessary with very good cooling to run this program.
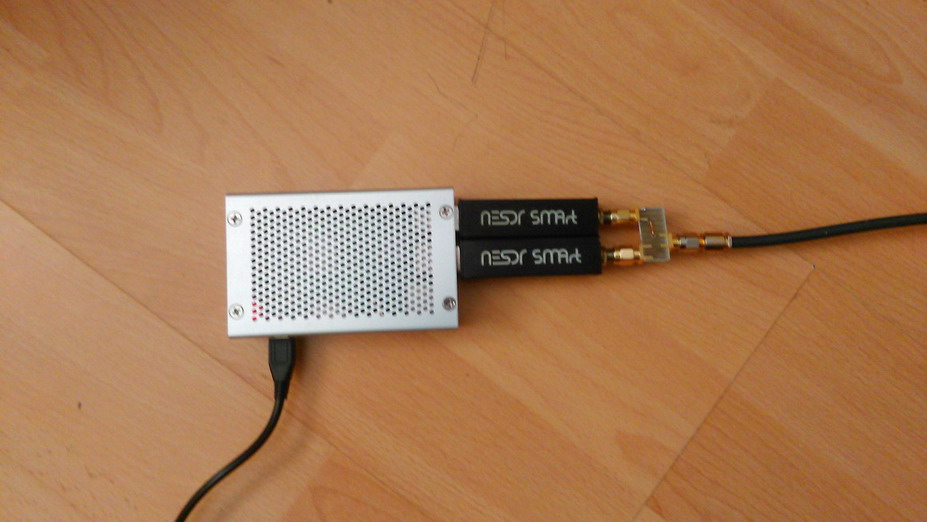
The use of a fan is necessary
- in fact, the radios need cooling too. Especially when using
NESDR SMArt radios that are directly plugged into Raspberry.
The use of each core in the processor can be checked with the htop
command. Only enable that many frequencies for each radio, that the load on any core does not exceed 90 to 92%.
The load is greatly influenced by the chosen number of frequencies, as
well as the used bandwidth. So, set only the necessary bandwidth. The
program keeps track of the conf.conf, conf_second.conf, conf_third.conf, conf_fourth.conf and station.cfg
configuration files. When detects a change in content, it will
automatically reconfigure itself without having to restart the system.
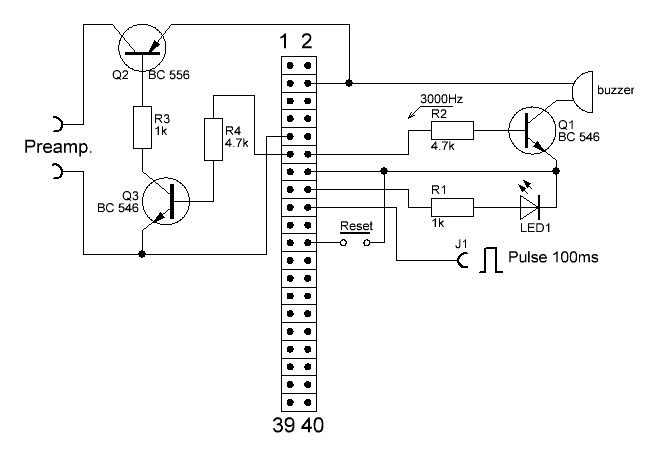
With a small hardwar, here we can generate optical and acoustic signals
when some of the tracked sonde comes into our area. In addition, with
the enable_preamp parameter, we can turn on or off the supply voltage
for the preamplifier.
One possible assembly for continuous operation with POE feed:
sonde_rx.tar.gz
full install
install program
install rtl-sdr
C files
original program
image of SD card: rs_ms.img
The software works with the
Jessie, Strech and Buster operating systems. It does not work with
Bullseye because this operating system does not yet have some libraries
implemented!!!
Newer version for Bullseye OS:
ms_new.tar.gz
full install:
wget www.om3bc.com/docs/MS/install_new.sh
chmod +x install_new.sh
./install_new.sh
install only MS (other packages are installed and working):
wget www.om3bc.com/docs/MS/install_ms_new.sh
chmod +x install_ms_new.sh
./install_ms_new.sh
The sonde_rx.pyc is for python2 and the sonde_rx3.pyc is for python3, similar for start.sh, start_sc.sh and stop.sh.
Python2 is not implemented in the operating system Bullseye.
ms_new package does not decode RS92!
Newer version for Bookworm OS:
ms5.tar.gz
full install:
wget www.om3bc.com/docs/MS/install_all_ms5.sh
chmod +x install_all_ms5.sh
./install_all_ms5.sh
install only MS (other packages are installed and working):
wget www.om3bc.com/docs/MS/ms5-install.sh
chmod +x ms5-install.sh
./ms5-install.sh
The sonde_rx3.py is for python3, similar for start3.sh, start_sc3.sh and stop3.sh.
Python2 is not implemented in the operating system Bookworm.
ms5 package does not decode RS92!
RS41 probes manufactured from 2025
onwards not only contain a new processor but also new firmware, so they
can no longer be decoded with old decoders.
Enter the bcMS/src directory cd ~/bcMS_new/src
Download the new file wget www.om3bc.com/docs/MS/sondeudp.c
Issue the make sondeudp command.
When the program has been compiled, stop the MS program ~/MS/stop3.sh
Copy sondeudp cp sondeudp ~/MS/bin
Then restart the MS ~/MS/start_sc3.sh (or ~/MS/start_sc.sh, or ~/MS/start.sh or ~/MS/start3.sh depending on how you want to start the program).